Using KQL in a Playbook for Sentinel
Fun with parsing JSON
I was working with a customer recently and they wanted to run a playbook in Microsoft Sentinel that would take an incident and look to see if the accounts in the incident were enable or disabled and then send an email to the security team giving them that information.
I ran into a few bumps on the road before I figured it out andRod Trent mentioned that it would make a good blog. So here we are.
To create the new playbook, go into Sentinel and select the Automation blade. Once there, hit the “Create” button at the top and click “Playbook with Incident trigger”.
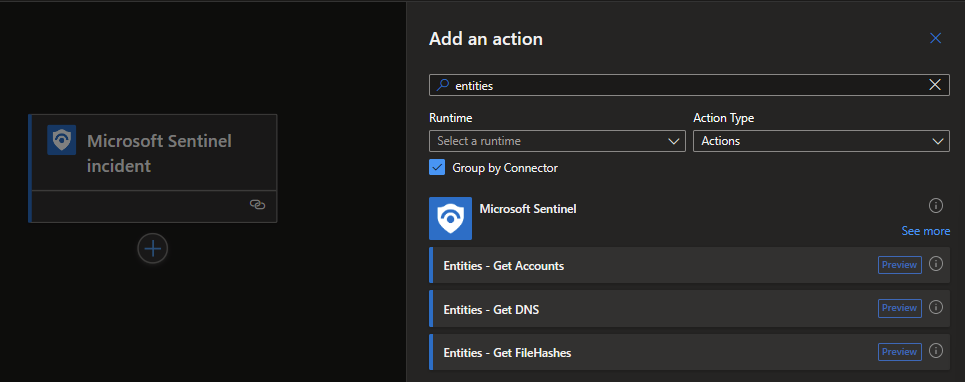
Give it a name and click through to “Review and create” and create the playbook. Once the logic app is created, we can go in and start configuring. Underneath the Microsoft Sentinel Incident trigger, hit the + sign and “Add an action”. In the Search box, type entities and select “Entities – Get Accounts”.
In the Parameters box, click the lightning bolt.
A box will pop up and in the search box type entities and click on “Entities” beneath the Microsoft Sentinel Incident section.
Then, “Add an action” and search for condition. Here you’ll have to select “See more” in the “Control” section and pick “For each”. Click on the “For each” box, select the lightning bolt and search for “Accounts” and select it.
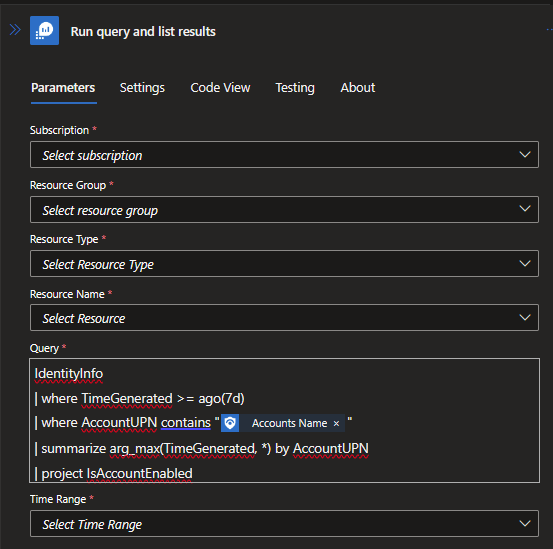
Now the fun starts. Click on the + sign to “Add an action”. Type run query in the search box and select “Run query and list results” in the “Azure Monitor Logs” section. In the Parameters section, input all the data that refers to your Azure environment. You input your KQL query in the Query box. For this particular use case, I’m looking in the IdentityInfo table to find out if in account is enabled or disabled. Here is the query I used.
IdentityInfo
| where TimeGenerated >= ago(7d)
| where AccountUPN contains ""
| summarize arg_max(TimeGenerated, *) by AccountUPN
| project IsAccountEnabled
Paste the KQL query in the box and go to the third line of the KQL query that starts with “where AccountUPN contains”. Put your cursor in between the quotation marks. Then select the lightning bolt and select “Accounts Name”. The query is now looking back 7 days for the account “Accounts Name”. It’s finding the most recent entry in the table and bringing back the value of IsAccountEnabled.
Now, add another For each condition via the “Add an action” button. In the Parameters box, click on the lightning bolt and select value. This is taking the results of the KQL query that you just ran so you can use it so show if the user is enabled or not. The value that we get is in JSON, so the next step is to parse the JSON.
“Add an action” and search for parse json. Select “Parse JSON” beneath the “Data operations” section. In the Content box, select the lightning bolt and pick “current item” in the For each 1 section. In the Schema box, paste this.
{
    "properties": {
        "IsAccountEnabled": {
            "type": "boolean"
        }
    },
    "type": "object"
}
It’s telling the logic app what to do with the KQL query output. I had a little trouble with this one. It took me a while to figure out the right way to do the parsing.
Now it’s time to add one more condition. Click “Add an action” and search for condition. Select “Condition” under the Control section.
Click on the “Condition” box. In the first box that says Choose a value, select the lightning bolt then click on “Body IsAccountEnabled” in the Parse JSON section. In the second box, select “is equal to”. In the last box, type true. I also had a little trouble here. I thought it would be easier to do a “contains” instead of “is equal to” and I was very wrong.
We now have two actions that can happen based on whether the condition is true or not. In my use case, if the condition was true (the user account was enabled) we sent an email to the security team that read “User XYZ is enabled”. And if the account was disabled, we sent one saying “User account is disabled”. But you could do lots of other things.
You could add a comment to the incident so the person working the case has more information.
You could add a task to the incident telling the analyst what next steps they should take.
You could add the user to a watchlist.
You could feed the information in to another KQL query to get even more information.
It’s really up to you!
Here is a look at the completed playbook.


Thanks Andrea!
I did the same thing but instead I called a runbook hybrid worker to get the data from local AD. The reason I did that is because I find the identity table is not updated fast enough if an account is disabled.